Some links below are affiliate links. If you buy through them we may earn a commission at no extra cost to you. We only list tools we would use ourselves. How we make money.
An AI 3D model generator for games can now take one piece of concept art and give you a textured, rigged character that walks, runs and idles in your engine. You get there in an afternoon, where modelling, retopology, UVs, rigging and skinning by hand would take days or weeks. The workflow that works for a solo or indie developer is short: make a clean concept image, turn it into 3D with Tripo (single image or multiview), set a polygon budget with Smart Mesh, auto-rig it, add preset animations, and send it to Unity, Unreal, Godot or Blender.
What you get is a strong first version, not a finished hero asset. Below are the exact steps and settings, which parts still need a human (deformation, UVs, a consistent art style, the licence on your plan), and a plain comparison with doing it by hand and with other AI tools. Everything here comes from official product pages and engine docs. We did not run a benchmark, so you won't find invented speed or quality scores.
What can an AI 3D model generator for games do in 2026?
Going by Tripo's own feature pages, a single tool now covers most of the asset pipeline that used to need four programs:
- Image, multiview or text to 3D. Upload concept art, a sketch or a photo, or describe the asset. Multiview accepts up to four fixed angles (front, left, right, back) and is for subscribers.
- Two kinds of mesh. HD Model goes up to about 2 million polygons for renders and 3D printing. Smart Mesh is the game-engine mode, with triangle meshes from 500 to 50,000 faces or native quad meshes from 500 to 25,000.
- PBR textures. BaseColor, Normal, Roughness and Metallic maps, so the asset lights correctly in a real-time engine.
- Auto-rigging and animation. Skeleton and skin weights for humans, quadrupeds and stylised characters, plus preset motions such as walk, run and idle.
- Export and engine bridges. FBX, GLB, OBJ, USD, STL and 3MF files, and a DCC Bridge that sends models straight into Blender, Unity, Unreal, Godot, Cocos, Maya, 3ds Max or ZBrush.
For a solo developer, the big change is not that AI makes perfect models. It's that the slowest stages (blocking out, retopology and first-pass rigging) now take minutes, which leaves your time for the parts players actually notice.
Step 1: Make concept art that converts cleanly to 3D
Image-to-3D only works as well as the picture you give it. Tripo's image-to-3D page warns that busy backgrounds, several subjects, motion blur and extreme perspective reduce accuracy, and that cropping to the subject usually fixes it. For a character you plan to rig, follow these rules:
- One character, full body, plain background. No props crossing the body and no cropped feet.
- Neutral pose: T-pose or A-pose. Arms away from the torso and legs slightly apart. Meshy's rigging docs say a T-pose or A-pose gives the most accurate rig, and the same logic holds for any auto-rigger. Arms fused to the hips are the most common reason a rig deforms badly.
- Even, flat lighting. Strong cast shadows can get baked into the texture.
- Clear silhouette, readable materials. Say "leather", "brushed steel" or "cloth" in the prompt so the texture pass has something to work with.
- Make a back view too if the character has detail on the back (a cape, a backpack, a tail). That's what multiview is for.
Here is a ready-made brief for a game hero concept. Generate a few versions, pick the clearest silhouette, then make matching side and back views of the same character.
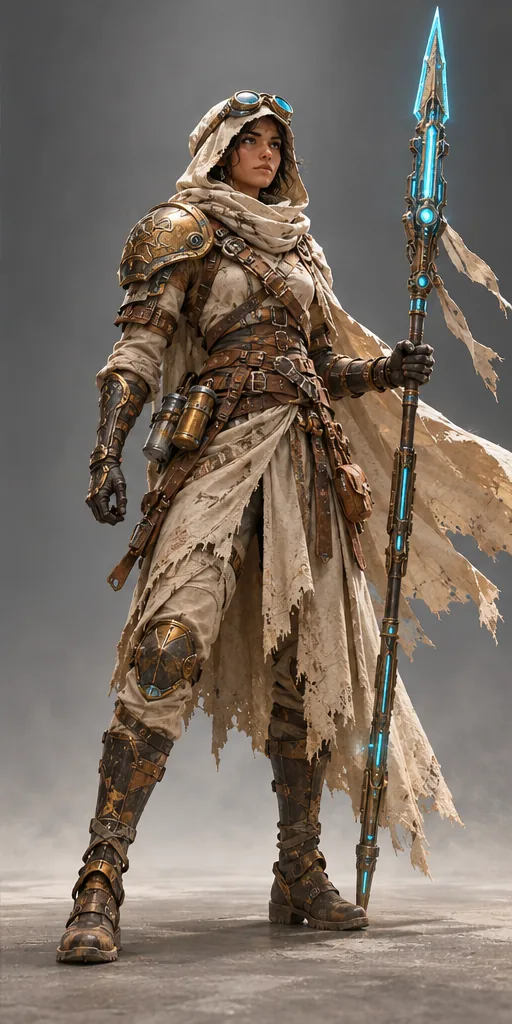 Game Hero Concept prompt
An original AAA game protagonist, a desert ranger in layered sand-colored cloth wraps and a tattered hooded cloak, worn bronze shoulder plate and gauntlets, utility belts with canisters, goggles on the hood, holding a tall spear with a glowing cyan energy core, standing in a confident full-body hero pose. · AAA Concept Art & PBR Material Callout Sheet · Camera: Full-body framing with feet visible, 85mm compression, centered on a neutral backdrop for clean image-to-3D conversion · Lighting: Large soft top light as key, subtle cool rim from behind, emissive cyan glow from the weapon core · game-ready character concept, clear readable silhouette, PBR materials (worn metal, cloth, leather), front view suitable for image-to-3D, plain background, high detail, production concept art --ar 3:4 --no cropped feet, busy background, motion blur, existing game franchise characters, logos, text, watermark, asymmetrical deformed hands, goreCustomise it in the free studio
If you don't draw, any good image generator can produce the concept sheet. Tripo has image generation built in (the pricing page lists Nano Banana on the free plan and more models on paid plans). If you want to compare many image models and styles side by side before you commit, a dedicated generator is handy:
Step 2: Turn the image into a 3D model in Tripo
This is the core of the workflow, and it runs in the browser. Tripo's image-to-3D page says generation, texturing, retopology, segmentation, rigging and animation all run server-side, so a normal laptop is enough.
Single image or multiview?
- Single image works on the free plan and is fine for props, pickups, rocks, crates and fairly symmetrical characters. The back is inferred, so check it.
- Multiview (up to four views) rebuilds surfaces from real reference instead of guessing. Use it for hero characters, asymmetric designs and anything with detail on the back. Tripo notes that even front plus back makes a big difference.
Preview, then retry
Before you texture or rig, check the result in the Solid and Normal preview views. Look for melted fingers, merged limbs and a lumpy back. Tripo offers free retries (three on the free plan, unlimited on paid plans), and a cleaner input image fixes most problems faster than editing a bad mesh.
Want a slower walkthrough of this step for one character? Our guide turning an image into a 3D character covers it screen by screen.
Step 3: Set the polygon count for mobile or PC with Smart Mesh
A raw AI mesh is often dense and messy, fine for a render but heavy for a game. Smart Mesh is Tripo's answer: you choose the topology type and a target polygon count before you generate. Tripo's game-development page describes typical game-ready output at around 5K to 20K faces.
| Mode | Range (per Tripo) | Use it for |
|---|---|---|
| HD Model | Up to ~2M polygons | Cinematics, marketing renders, baking a high-poly source, 3D printing |
| Smart Mesh, quads | 500 to 25,000 | Characters and anything that bends: quads give predictable edge loops at joints |
| Smart Mesh, triangles | 500 to 50,000 | Static props and environment pieces that ship unchanged |
How to pick your number
There is no universal "mobile number". The right budget depends on your engine, your target device, how many characters are on screen and your camera distance. A practical method:
- Drop one placeholder character into your actual game scene on your weakest target device.
- Profile it, then set the Smart Mesh budget for everything in that class (hero, enemy, background NPC, prop) and stick to it.
- Go lower for things that are small on screen. Generate a second, lighter version if you need LODs. Tripo says its quad output is optimised for downstream LOD generation.
Note that the free plan lists Smart Mesh as limited access. Tripo's April update notes announced a Smart Mesh free trial for all users, and full access comes with paid plans.
Step 4: Auto-rig the character and add animation presets
Rigging is where most solo developers get stuck, and where AI saves the most time. Tripo's auto-rigging page says it detects the skeleton and paints skin weights automatically for humans, quadrupeds, stylised characters and even mechanical creatures. You can also upload your own OBJ, FBX or GLB to rig. Rigged files export as FBX or GLB with the skeleton included.
- Choose the rig type: biped for humanoids, quadruped for animals.
- Test with a walk, run and idle before you export. Watch the shoulders, elbows, knees and the crotch area: that's where bad weights show first.
- Add the presets you need. Tripo's developer docs list more than 100 preset animations (90+ of them for bipeds) on the original rig version. The newer rig versions list 16 universal presets, so the available set depends on which version you use.
- Ask for in-place motion if your engine drives movement. The animation API has an in-place option that removes root motion, which is what most character controllers expect.
The presets give you a prototype and a vertical slice. For a signature attack, a custom jump arc or facial animation, export the rig and animate in Blender, or retarget clips from a library such as Mixamo, which Tripo lists as an export target.
Step 5: Export to Unity, Unreal, Godot or Blender
You have two routes: download a file or use the DCC Bridge.
Files
- Unity: use FBX. Unity's manual lists .fbx, .dae, .dxf and .obj as the formats it reads natively. glTF isn't on that list.
- Godot: use GLB. Godot's docs mark glTF 2.0 as the recommended 3D format, especially for animated scenes. FBX also imports through the built-in ufbx importer from Godot 4.3.
- Unreal and Blender: FBX with skeleton and animation is the safe default. GLB also works in Blender.
DCC Bridge
The Bridge lets you click Send in Tripo Studio and have the model show up in your open editor. According to Tripo, there are bridges for Unity, Unreal Engine 5.4+ and Blender 4.1+, plus Godot, Cocos and others. Two limits: the Bridge needs a Pro, Max or Team plan (the free plan does not include it), and the Blender add-on needs Tripo Studio running in Chrome, Edge or Opera. After import, always check scale, materials and that the animation clips came through.
What still needs a human (and how long to budget for it)
Tripo's marketing says Smart Mesh output needs no retopology. Treat that as a promise you check, not something you assume. These are the jobs that still land on you:
- Deformation at the joints. Bend every limb to its extreme pose. If an elbow collapses or a skirt clips through a leg, fix the edge loops or the weights in Blender.
- UVs and texture seams. Exports come with UVs and PBR maps, but look for stretched or visible seams on the face and hands, where players look most.
- Style consistency. Ten assets generated separately can look like they come from ten different games. Lock a style with a shared prompt, palette and reference sheet, and do a final texture pass in your own style if needed.
- Gameplay fit. Collision shapes, pivots, sockets for weapons, LODs and material set-up in your engine are still your job.
- The licence on your plan. Tripo's pricing page lists free-plan models as public and non-commercial. Its terms say Tripo keeps the rights to inputs and outputs from free users, while paid users generally hold the rights to their outputs. If the asset goes into a game you sell, generate it on a paid plan and keep a copy of the terms that applied then.
Reality check. "An afternoon" is realistic for a first playable version of one character or a handful of props: generate, rig, test in-engine and fix the worst problems. A polished hero character that holds up in close-ups still takes human cleanup, and some generations simply won't work and need a new input image. AI shortens the boring parts of the pipeline. It doesn't replace art direction, and it won't make an unclear concept read well in 3D.
AI vs by hand vs other AI tools: an honest comparison
This table compares documented capabilities, not test results. It's based on each vendor's official pages as of October 2026. Features and plans change, so check before you buy.
| By hand (Blender etc.) | Tripo | Meshy | Rodin (Hyper3D) | |
|---|---|---|---|---|
| Input | Your own modelling | Image, multiview (up to 4), text | Image, text | Image, optional extra views, text |
| Polycount / topology control | Full control | Smart Mesh: quads 500 to 25K, tris 500 to 50K | Check current docs | Smart Low-Poly option |
| Auto-rigging | Manual, or a separate auto-rigger | Bipeds, quadrupeds, creatures | Humanoids (quadrupeds get a walk cycle); T/A-pose recommended | Not listed on the homepage |
| Animation presets | Make or buy your own | 100+ on rig v1.0; 16 universal on newer rigs | 600+ humanoid presets | Not listed on the homepage |
| Engine plugins | Not needed | DCC Bridge (paid plans): Unity, Unreal, Blender, Godot and more | File export (FBX, GLB, USDZ) | Blender, Unity, Unreal, Godot and more |
| Main weakness | Time and skill | Cleanup still needed on hero assets; free plan non-commercial | Preset library is humanoid only | Rigging not part of the advertised pipeline |
Our take for a solo developer: Tripo is the most complete single path from concept to a rigged, engine-ready file, mainly because of polycount control at generation time plus rigging and engine bridges in one account. Meshy has the bigger humanoid animation library. Rodin is worth a look if you already rig elsewhere. For final hero assets, the best pipeline is usually AI for the first 80% and your own hands for the last 20%.
Making 3D assets for players' shelves rather than their screens? See our sibling guides on turning an AI character into a 3D-printed action figure and making money with AI and 3D printing. You can also start your concept prompt in the free prompt studio or browse every tool in the directory.
FAQ
What is the best AI 3D model generator for games?
For a solo developer who wants one path from concept art to a rigged, engine-ready file, Tripo covers the most steps in one place: image or multiview to 3D, Smart Mesh polycount control, auto-rigging, presets and engine bridges. Meshy has a larger humanoid animation library. Compare them on your own concept art before you choose.
Can I use AI-generated 3D models in a commercial game?
It depends on the tool and your plan. Tripo's pricing page lists free-plan models as public and non-commercial, and paid plans as private with commercial use. Read the current terms of any tool before you ship.
Are AI 3D models game-ready out of the box?
Often close for props and background characters, rarely perfect for hero characters. Check polycount, joint deformation, UV seams and scale in your engine, and plan time for cleanup in Blender.
How do I import an AI 3D model into Unity?
Export FBX, which Unity reads natively, and import it into your Assets folder. With a paid Tripo plan you can instead use the Unity DCC Bridge to send the model straight into the editor.
What polycount should a mobile game character have?
There is no single number. Profile one character on your weakest target device, then set a Smart Mesh budget for each asset class. Tripo describes typical game-ready output at around 5K to 20K faces.
Sources
- Tripo: AI 3D model generator for game developers
- Tripo: Smart Mesh
- Tripo: Image to 3D model
- Tripo: AI auto rigging
- Tripo developer docs: Animation
- Tripo: Pricing and plan comparison
- Tripo: DCC Bridge for Blender
- Tripo: Terms of Service
- Meshy docs: Animate guide
- Hyper3D Rodin
- Godot docs: Available 3D formats
- Unity Manual: Supported model file formats